Laguna Bandsaw: Difference between revisions

From North Forge
Jump to navigation Jump to search
Ttenbergen (talk | contribs)
No edit summary
Ttenbergen (talk | contribs)
No edit summary
 
Line 6: Line 6:
| related tools =   
| related tools =   
| trainers = Paolo Riva | knowledge keepers = | SDS link =  | SWP link =   
| trainers = Paolo Riva | knowledge keepers = | SDS link =  | SWP link =   
| consumables = North Forge provides a carbide tipped re-saw blade and some other blades }}
| consumables = North Forge provides a carbide tipped re-saw blade and some other blades  
| other details =
* Electrical power to the {{PAGENAME}} is controlled by the [[Woodworking dust collection interlock system]]
}}

Latest revision as of 20:30, 2024 August 16

Tools

Picture of Laguna Bandsaw in the fablab

Model LT18 3000 series Model MBAND184200
Room Woodworking Room
Work envelope/max capacity
Link to manual https://go.rockler.com/tech/Laguna-Tools-Italian-LT18-Bandsaw-Manual.pdf
Related tools
Trainer(s) Paolo Riva
Training Sessions
Knowledge keeper(s)
Training document(s)
Material Safety Data Sheet (MSDS)
Safe Work Procedure
Consumables North Forge provides a carbide tipped re-saw blade and some other blades
Software this machine has no software listed
Equipment type tool
Woodworking Room Precautions apply   

You will be working in the Woodworking Room . In order to keep safe from hazards created by you or other workers using any of the tools in this room, the following precautions apply in addition to any other precautions:

Safety

Hazards

  • Dust
  • Noise
  • Fire (friction from tools, polymerizing oils)
  • Projectile (materials or tools shattering, kicking back)
  • Laceration (sharp tools or workpieces)
  • Entanglement (spinning parts sucking user into equipment)

PPE

  • Hearing Protection
  • Respiratory protection (minimum N95 mask; respirator preferred)
  • Safety Glasses
  • Safety shoes

Tie back or remove loose hair, clothing, jewelry, etc.

Precautions

Do

  • Read the Safe Work Procedure and obtain North Forge approval before using the equipment for the first time.
  • Plan cuts carefully; use safety devices (push sticks, clamps, sleds, featherboards) where required.
  • Maintain a calm but vigilant attitude. If you are stressed or in a hurry, it’s best not to use the equipment.
  • Tie back long hair and jewelry; remove earbuds and hoodie cords.
  • Check the workspace for slip and trip hazards.
  • Ensure the equipment is in good condition (guards installed and working, blades are sharp and intact, no clogs in dust extraction hoses).
  • Make sure others in the area are aware of what you're doing. Warn any bystanders if your work can affect them.
  • Inspect the material for cracks, knots, or debris before starting - material can shatter or kick back if it is not stable.
  • Stand outside of any kickback zones.
  • Check the equipment for trapped debris when done, particularly trapped beside or under blades.
  • Use a brush and/or vacuum to clean most of the dust before finishing with compressed air.
  • Follow instructions in Oily Rags Bins

Do not

  • Use the equipment if you are tired, intoxicated, or otherwise impaired
  • Rush
  • Distract operators - if you need to get someone’s attention, stand to the side and wait until they notice you. Do not wave, shout, or touch the operator.
  • Leave the equipment with equipment still running - note that hearing protection can prevent users from hearing when the blade is/is not running.
  • Cut or sand metal due to risk of sparks and equipment/property damage.
  • Dispose of oily rags in the general waste bins.

Housekeeping

  • Check the working area for slip and trip hazards (sawdust, oil, offcuts) before and after working
  • Do not leave air hoses or extension cords laying across walkways where people can trip on them
  • Check hoses for excess sawdust or other clogs
  • Empty the dust collector if it is filled to more than halfway up the viewing window (~1 garbage bag worth of dust)
  • Empty waste bins if they are more than 75% full
    • Bag waste should be less than 6x6”
    • Blunt any sharp corners that could puncture the bag
    • Replace waste bags after emptying
    • Firewood bins are only for untreated wood with no paints or stains
  • Spread oily rags out to dry and dispose of them in the oily rags bin.
  • Return all fab lab tools to their proper locations
  • Remove all personal tools, materials, and equipment from the room
    • Fire code prohibits storing material in the wood room
  • Turn off the equipment and dust collector.
  • Turn off the room exhaust if you are the last one in the room.
    • Room exhaust is interlocked with equipment power; turning off the exhaust will turn off all equipment in the room!

edit these instructions at Instructions:Laguna Bandsaw

Purpose

The band saw has a vertical blade. It is used for:

  • Ripping rough lumber that does not fit on the jointer
  • Cutting freehand curves (limited by the depth of the blade)
  • Resawing (cutting boards to different thicknesses)

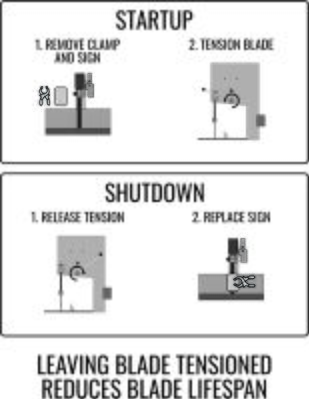
The Laguna bandsaw is equipped with a carbide blade and can be used for resawing; the carbide blade must be de-tensioned after use to prevent warping.

Safety

Do:

  • Check that the fence is square if required
  • Make sure the blade on the large band saw is tensioned before use and de-tensioned after use
  • Lower the guard so it is close to the workpiece before starting
  • Ensure the blade is fully stopped before leaving the area
  • Check beside the blade for trapped debris when done

Do not:

  • Cut round workpieces without a sled or fixture
  • Attempt to change the blade without prior training
  • Let fingers come close to the blade - use a push stick if required, especially at the end of cuts
  • Leave the equipment while the blade is still moving - the band saw blade takes a long time to slow down without the brake
  • Use excessive force - let the blade do the work
  • Continue working if you notice sparks from the guard - you may be pressing too hard, or the guard guides may need to be adjusted

Emergency Stop

The band saw can be stopped by pressing the stop button and applying the foot brake (on the right side of the equipment).

Operating Procedure

  1. Remove the clamp and tension sign from the blade.

for all

Do we want to include instructions on where to put the sign to maximize chances of re-applying it and remembering to untension?

  • Cargo


  • Categories
  1. Apply tension to the blade using the tension lever.
  2. Set the blade guard to slightly above the height of the workpiece.
  3. Set the fence if required - note that fence may not be square by default and may require shims. Consult trainer or manual for assistance.
  4. Prepare any safety devices (featherboard, push blocks, sleds for round pieces etc)
  5. Carefully feed the material through the saw, letting the blade do the work.

Shutdown and Housekeeping

  • Remove and store fixtures and safety devices
    • Featherboards and push sticks are stored on the wood room peg board, and some with magnets on the top of the body of the band saw.
  • Wipe outside of saw (table, fence, handles) with a brush
  • Check dust collector tube for debris/clogs
  • De-tension the blade and clamp the warning sign to it. The blade can be damaged if you do not de-tension it.
  • Sweep the floor around the band saw, miter saw, and table saw
  • Turn off the equipment and dust collector
  • Turn off the main exhaust if you are the last one in the room
    • Turning off the exhaust will turn off all equipment in the room.